 Previous | Index | Next Previous | Index | Next 
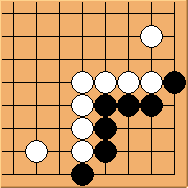
Diagram 10.1: White to play
Black has no external liberties but hanes at both sides. Can white do anything?
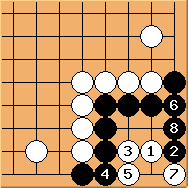
Diagram 10.2: Solution
Because of symmetry  can attach at either side.
We've already learned the importance of can attach at either side.
We've already learned the importance of  and and  in earlier articles
- they both help to keep sufficient eyespace.
The result is a 10000-year ko. in earlier articles
- they both help to keep sufficient eyespace.
The result is a 10000-year ko.
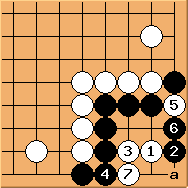
Diagram 10.3: Variation
 is incorrect. After is incorrect. After  black can safely play elsewhere.
White still need to throw in at 'a' to form the 10000-year ko, wasting one move. black can safely play elsewhere.
White still need to throw in at 'a' to form the 10000-year ko, wasting one move.
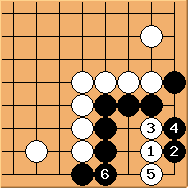
Diagram 10.4: Variation
How about  ? is a good move.
This is a typical seki shape in the corner. ? is a good move.
This is a typical seki shape in the corner.
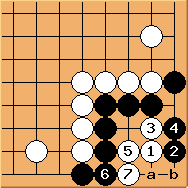
Diagram 10.5: Variation
is an alternative,
after / exchange, black can play tenuki.
This shape is rather interesting: black does not need to do anything;
white is unwilling to play 'a' (that would become seki), but before throwing in 'b',
white has to reduce black's external liberty first in order to form a direct ko.
Because of this nature, I consider this shape also a 10000-year ko, although it does not look like one.
Black has two extra moves to prepare the ko fight (for example creating ko threats elsewhere).
If black is unhappy to wait and ko-threat situation is appropriate,
black can play 'a' immediately, resulting in a 1-move approach ko to his favour.
Generally speaking, with two first-line hanes, white is unlikely to
cause black serious troubles. Diagram 10.5 may be white's best chance.
Previous | Index | Next
|