 Previous | Index | Next Previous | Index | Next 
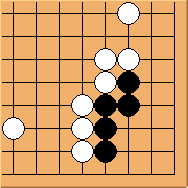
Diagram 18.1: White to play
This shape is commonly seen in real games. Please consider what white can do?
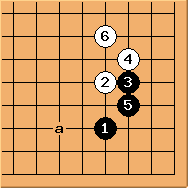
Diagram 18.2: Common joseki
In this popular joseki, instead of continuing at 'a', black may
choose to play a pincer move at right side if conditions are suitable.
This may lead to the following:
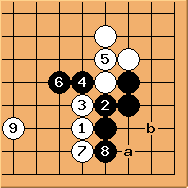
Diagram 18.3: Common joseki (continued)
 may play at may play at  to secure the corner but white would get a nice wall outside.
With some fighting spirit, black can choose this variation.
Note that pros always make / to secure the corner but white would get a nice wall outside.
With some fighting spirit, black can choose this variation.
Note that pros always make / exchange, rather than playing , 'a',
, 'b' sequence - it is very important to leave some aji in the corner.
As you may have guessed, the corner is safe for the moment and black can take care of the two outside stones first. exchange, rather than playing , 'a',
, 'b' sequence - it is very important to leave some aji in the corner.
As you may have guessed, the corner is safe for the moment and black can take care of the two outside stones first.
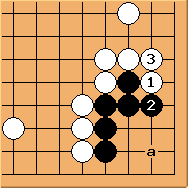
Diagram 18.4: Black comfortable
 and and  create a standard Carpenter's Square.
But black can live comfortably by playing 'a', or be more ambitious to play tenuki and get ready for a ko fight. create a standard Carpenter's Square.
But black can live comfortably by playing 'a', or be more ambitious to play tenuki and get ready for a ko fight.
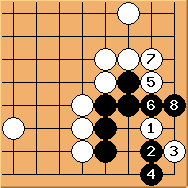
Diagram 18.5: Normal development
This diagram shows the normal development.
Although is the urgent point, there is not much white can do in this corner.
Pros often make / / exchanges first,
leaving the exchanges first,
leaving the  and yose to play at a much later time. and yose to play at a much later time.
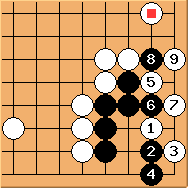
Diagram 18.6: One possibility
Why do pros like to keep these exchanges? This shows one possibility.
If white somehow gets  in sente during mid-game, a ko fight can be created.
This is exactly what happened in this pro game ( in sente during mid-game, a ko fight can be created.
This is exactly what happened in this pro game ( , move 117 onward),
where Rin Kaiho exploited the corner aji and won the Tengen title. , move 117 onward),
where Rin Kaiho exploited the corner aji and won the Tengen title.
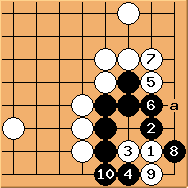
Diagram 18.7: Seki (11=a)
If attacks here, black can form a seki by occupying the key point .

Diagram 18.8: Variation
is possible too. The result is also a seki.
Conclusion: black corner is alive. Both sides need to be aware of the aji in the corner.
Previous | Index | Next
|