 Previous | Index | Next Previous | Index | Next 
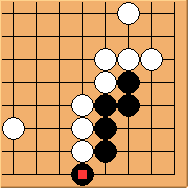
Diagram 20.1: White to play
Does  help in any way? help in any way?
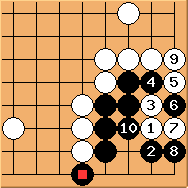
Diagram 20.2: False hope
 is incorrect. Black is expecting this sequence similar to Diagram 19.2.
would help in this case. However...... is incorrect. Black is expecting this sequence similar to Diagram 19.2.
would help in this case. However......
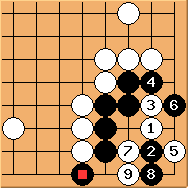
Diagram 20.3: Black fails
 is the correct answer.
Note that white can use this sequence in Shape 19 as well. is the correct answer.
Note that white can use this sequence in Shape 19 as well.
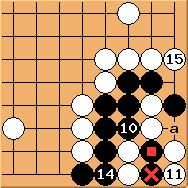
Diagram 20.4: Continued (12=, 13= ) )
Black is one liberty too short and cannot play 'a'.
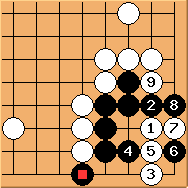
Diagram 20.5: Black fails
So black has to block at .
However,  is incorrect.
This result is the same as Diagram 19.3 and black fails to make use of . is incorrect.
This result is the same as Diagram 19.3 and black fails to make use of .
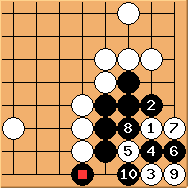
Diagram 20.6: Solution 1
Unlike Diagram 19.4, tesuji now works.
Thanks to black can throw in  to start a ko fight. to start a ko fight.
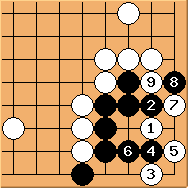
Diagram 20.7: Variation
may atari from the other side, forming a different ko. But note that
black takes the ko first so this result cannot be good for white.
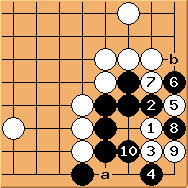
Diagram 20.8: Solution 2
Since in the previous diagram appears to be the key point,
 wants to occupy that location first.
To avoid the failure in Diagram 20.5,
is a must. is a nice idea.
Black has to go back to to avoid the Bulky Five killing shape.
So the result is a ko.
If black wins the ko fight by connecting at ,
white can still play 'a' to form a seki, destroying 9 points of territory,
although black also has a yose at 'b' that can get a few points back.
Overall this solution seems to be slightly worse than
Solution 1 for black. wants to occupy that location first.
To avoid the failure in Diagram 20.5,
is a must. is a nice idea.
Black has to go back to to avoid the Bulky Five killing shape.
So the result is a ko.
If black wins the ko fight by connecting at ,
white can still play 'a' to form a seki, destroying 9 points of territory,
although black also has a yose at 'b' that can get a few points back.
Overall this solution seems to be slightly worse than
Solution 1 for black.
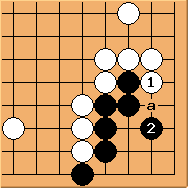
Diagram 20.9: White fails
 is a thoughtless move, hoping black to block at 'a' so that knowledge in Shape 7 can apply.
But is good - please verify that black is unconditionally alive now. is a thoughtless move, hoping black to block at 'a' so that knowledge in Shape 7 can apply.
But is good - please verify that black is unconditionally alive now.
To summarise: black corner is quite resilient because of the hane move.
Diagram 20.6 and Diagram 20.8 are the right solutions, resulting
in ko.
Previous | Index | Next
|